In the “Available Date/Time” field, select a specific date and time you'd like the form to become available online. This allows you to make a form in advance before launching.
Learning Centre
Launch or Decommission a Form
Once your form is complete, you need to launch or publish the form to make it available to the public.
To launch or publish a form:
- Navigate to the form you'd like to launch on Govstack Forms
- Select the “Launch” tab located at the top of the form
- Copy the URL address provided and make it available to the public
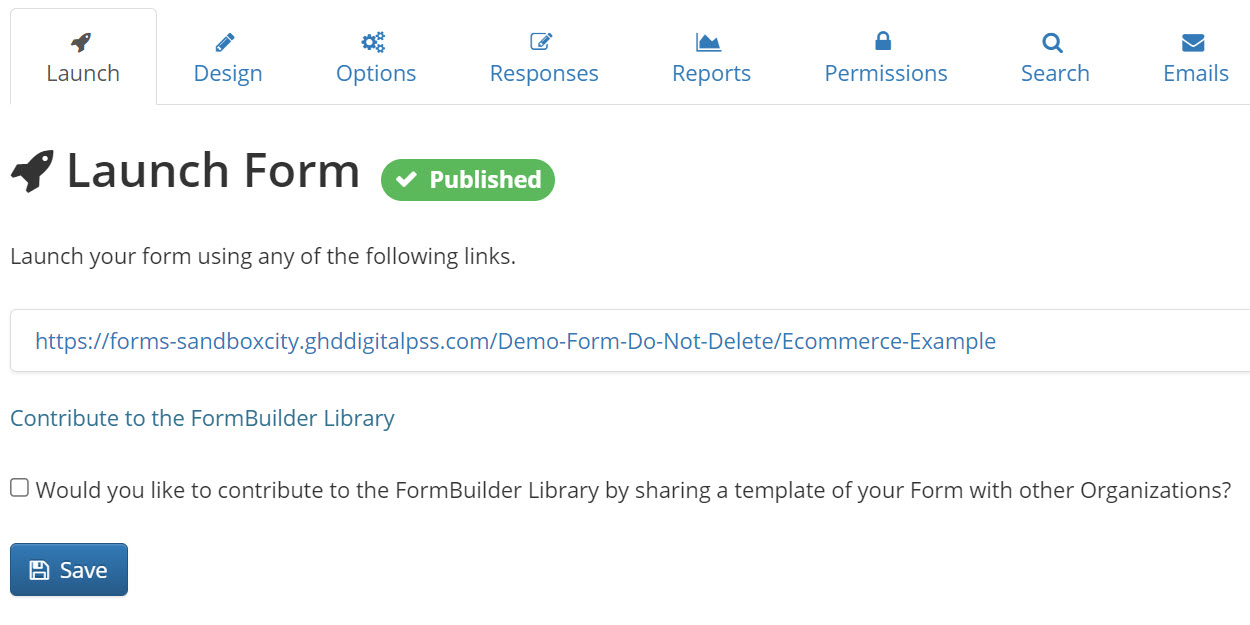
Govstack Forms Launch Tab
To share the URL address, you can:
- Hyperlink the URL to a page on your website
- Distribute the URL via email
- Include the URL in a calendar or news item
Set up general form options
To access the general form options:
- Navigate to the appropriate form
- Select the “Options” tab located at the top of the form
- Click the “General Options” button from the vertical menu located to the left of the screen
Before you launch your form, review and edit the general form options, which include:
Select the “Would you like to define a closing date and time?” checkbox to set a specific closing time for the form. In the “Closed Date/Time” field, select the date and time you'd like to remove the form from the public.
In the “Response Limit” field, enter the maximum number of responses for this form. When the specified number is reached, the form will no longer accept responses.
Review the different response types available for your form:
- Multiple Responses (allows the same user to provide multiple responses to the form; this is the default option)
- Single Response (users are only allowed to respond once to the form)
- Single Response Updatable (users are only allowed to respond to the form once, but they can update their responses)
Single response and single response updatable forms rely on browser information to function properly. Many disk clean-up tools and antivirus software remove this information. As a result, these options may not function as intended.
Review the toggle option settings for each form.
Display save button
If you want a save button to appear on each page of the form, select the “Would you like to display a save button on each page with questions?” This will allow respondents to save what they have entered on a page and return to the form later if desired.
Once you've added a save button to a form, you can configure the email that gets sent to a user when they save a form response part way through completing the form. Learn how to configure the email through email options.
Display clear button
If you want to add a clear form button on each page, select the “Would you like to display a clear button on page with questions?” checkbox. This will allow respondents to clear all of the information they've entered on a particular page.
IP address options
If you want to make all responses to the form completely anonymous, select the “Would you like to disable IP address tracking for this form?” checkbox.
Disable validation
If you want to allow users to turn off the “required answer” option that may be added to multiple questions on a form, select the “Would you like to disable validation for this form?” checkbox. This is useful if you want to test a form without having to complete all of the required fields. This option must be turned off before you launch the form to your website.
Enable status tracking
If you want to track the status of responses, select the “Would you like to enable status tracking for this form?” checkbox.
Web API feature
If you want to enable extended communication between the application and other automated processes, select the “Would you like to enable the Web API feature for this form?” checkbox. Learn more about the Web API features.
Decommission a form
Forms can be decommissioned (or deactivated) by applying a closing date and time.
The closing date and time settings can be located in the “General Options” section under the options tab. Select the “Would you like to define a closing date and time?” checkbox and enter the date and time you want to decommission the form. The form will stop accepting responses at this date. For an immediate shut down, set the parameters to any point in the past.
Contact Us
GHD Digital Support
Primary +1-866-691-5528
Secondary +1-519-884-2476
Submit Online
Need Help?


